Practice
1. Scenario
- After creating a sample table, create a lambda function to register data.
2. Environment configuration
- Execute the following query in the local database to create the test
SchemaandTable.
CREATE SCHEMA guide DEFAULT CHARACTER SET utf8 ; // 1

CREATE TABLE guide.TEST_TABLE // 2
(
  `SYS_ID` varchar(32) NOT NULL,
  `SYS_CREATE_BY` varchar(32) DEFAULT NULL,
  `SYS_MODIFY_BY` varchar(32) DEFAULT NULL,
  `SYS_CREATE_DATE` datetime DEFAULT NULL,
  `SYS_MODIFY_DATE` datetime DEFAULT NULL,
  `SYS_FLAG` char(1) DEFAULT NULL,
  `SYS_TYPE` varchar(32) DEFAULT NULL,
  `TL_APL_ID` varchar(32) NOT NULL,
  `TL_ACC_ID` varchar(32) NOT NULL,
  `TEST_NAME` varchar(100) DEFAULT NULL,
  `TEST_DESC` varchar(250) DEFAULT NULL,
  `MEM_ID` varchar(100) DEFAULT NULL,
  `MEM_NAME` varchar(100) DEFAULT NULL,
  `MEM_DESC` varchar(250) DEFAULT NULL,
  `MEM_NO` varchar(250) DEFAULT NULL,
  `ACTIVE_FLAG` char(1) DEFAULT NULL,
  PRIMARY KEY (`SYS_ID`)
);- Run the following query to verify that the table has been created successfully.
3. New project creation
- Click on the
Newbutton and start the process to create a new project.
Input lambda name in the top of the popup and click on the
Enterand proceed
After that, new project will be created with the name inputted in
Local Project
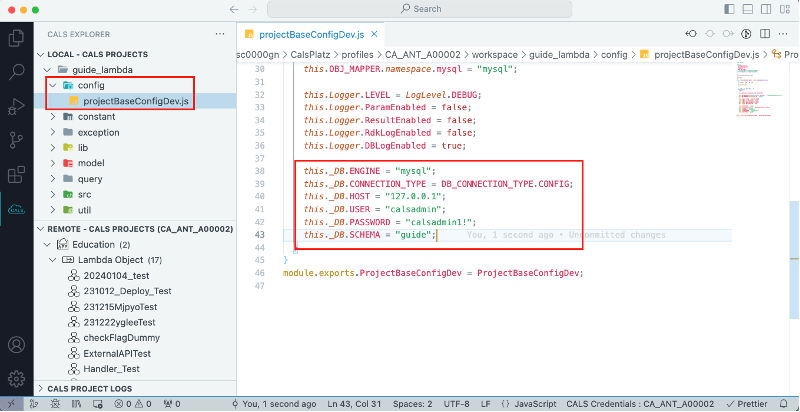
4. Set config
- Can correct configuration of
DB host,user,password,schemawithinconfig/projectBaseConfigDev.js file.
5. Creating source code
5.0. Caution
The constructor sections of controller, service, and DAO files are part of the framework's default settings, so it is not recommended to modify them without a special reason.
5.1. Controller
src/controller.js - process function check validity of request message and create default setting values.
 async process() {
  // Creating parameter log
  calsLogger.param(this.event, this.context);

  // Setting parameter default value
  this.objRequestParams.sampleName = "test1";
  this.objRequestParams.sampleDesc = "test1";

  // Validate parameter
  if (CompareUtility.isEmpty(this.objRequestParams.sampleName)) {
    throw new ParameterNonExistException("sampleName");
  }
  if (CompareUtility.isEmpty(this.objRequestParams.sampleDesc)) {
    throw new ParameterNonExistException("sampleDesc");
  }

  // Validate parameter, call actual serve
  this.objReturn = await this.clsService.runMethod({
    objRequestParams: this.objRequestParams,
    objReturn: this.objReturn,
  });

  // Creating log result
  calsLogger.result(this.objReturn);

  // Return the result value and terminate the Lambda function
  return this.objReturn;
}
5.2. Model
In the model/lambdaModel.js file, write the code to create data objects that will be inserted into the DB.
class SampleAddDataModel extends ApplicationLambdaBaseModel {
 constructor () {
   super()
   this.sampleName = ''
   this.sampleDesc = ''
 }
}
exports.SampleAddDataModel = SampleAddDataModel
5.3. Service
In src/service.js file, create a logic to execute
 async runMethod ({ objRequestParams, objReturn }) {
   calsLogger.param(objRequestParams)
   // 1. Create model register data
   const SampleAddDataModel = require('../model/lambdaModel').SampleAddDataModel
   const objSampleAddDataModel = new SampleAddDataModel()

   // 2. Register data register data in model
   objSampleAddDataModel.sampleName = objRequestParams.sampleName
   objSampleAddDataModel.sampleDesc = objRequestParams.sampleDesc

   // 3. Input data
   const objAddReturn = await this.clsDAO.addData(
      {
        objDAOParams: objSampleAddDataModel,
        objReturn
      })

   if (objAddReturn.affectedRows === 0) {
     throw new NoAffectedDataException(
       ProjectBaseConstant.ERROR_MESSAGE.NO_AFFECTED_QUERY
     )
   }
   calsLogger.result(objReturn)
   return objReturn
 }
5.4. DAO
In the src/dao.js file write the code that performs data access and modification logic for the DB.
async addData ({ objDAOParams, objReturn }) {
  // Create parameter log
  calsLogger.param(objDAOParams)

  // Insert data
  const objDAOReturn = await this.insert({
    sQueryId: 'insertData', // query ID to be executed
    objParam: objDAOParams, // parameter to be used in query
    objReturn
  })

  // Create result value log
  calsLogger.result(objDAOReturn)

  // return result value
  return objDAOReturn
}
The functions that can be user to execute query in dao include,
(※ Please ensure that each function and query will be matched )
- insert : You can run
insertquery inxmlunder./query/mysql - update : You can run
updatequery created inxmlfile under./query/mysql - delete : You can run
deletequery created inxmlfile under./query/mysql - select : You can run
selectquery created inxmlfile under./query/mysql
Request object and Response object of each function are as below
- insert –
Requestobject
| Element name | Request level | Data type | Explanation |
|---|---|---|---|
| sQueryId | Required | String | In queries created in XML, the ID for the query to run when executing an insert. |
| objParam | Required | Object | Object contains values to be changed by the Mapper created in XML. |
| objReturn | Required | Object | Return object is provided in the Framework (object created in the Controller object). |
| bIgnoreFlag | Optional | Boolean | Ignore validation query (default value: true). True: Query does not affect the actual DB, error. False: Query does not affect the actual DB, success. |
- insert -
Responseobject
| Element name | 2depth element name | 3depth element name | Data type | Explanation |
|---|---|---|---|---|
| objReturn | Object | |||
| success | Boolean | Indicates whether the insert was successful or not. | ||
| data | Array | Data received as the result of the insert. | ||
| sysId | String | SYS_ID of data created as new when executing the insert. | ||
| requestID | String | Unique ID created for each lambda request. | ||
| error | Object | Error object. | ||
| affectedRows | Integer | Number of rows created by the query insert in the DB table. |
- update -
Requestobject
| Element name | Request level | Data type | Explanation |
|---|---|---|---|
| sQueryId | Required | String | In queries created in XML, the ID for the query to run when executing an update. |
| objParam | Required | Object | Object contains values to be changed by the Mapper created in XML. |
| objReturn | Required | Object | Return objects are provided by the framework (objects created within the Controller). |
| bIgnoreFlag | Optional | Boolean | Ignore validation query (default value: true). True: Query does not affect the actual DB, error. False: Query does not affect the actual DB, success. |
- update -
Responseobject
| Element name | 2depth element name | 3depth element name | Data type | Explanation |
|---|---|---|---|---|
| objReturn | Object | |||
| success | Boolean | Indicates whether the update result is successful or not. | ||
| data | Array | Data received as the result of the update. | ||
| sysId | String | SYS_ID of data created as new when executing an insert. | ||
| requestID | String | Unique ID created for each lambda request. | ||
| error | Object | Error object. | ||
| affectedRows | Integer | Number of rows affected by the update query in the DB table. |
- delete -
Requestobject
| Element name | Request level | Data type | Explanation |
|---|---|---|---|
| sQueryId | Required | String | In queries created in XML, the ID for the query to run when executing delete. |
| objParam | Required | Object | Object containing values to be changed by the Mapper created in XML. |
| objReturn | Required | Object | Return object is provided by the Framework (object created in the Controller object). |
| bIgnoreFlag | Optional | Boolean | Ignore validation query (default value: true). True: Query does not affect the actual DB, error. False: Query does not affect the actual DB, success. |
- delete -
Responseobject
| Element name | 2depth element name | 3depth element name | Data type | Explanation |
|---|---|---|---|---|
| objReturn | Object | |||
| success | Boolean | Indicates whether the delete result is successful or not. | ||
| data | Array | Data received as the result of the delete operation. | ||
| sysId | String | SYS_ID of data created as new when executing an insert. | ||
| requestID | String | Unique ID created for each lambda request. | ||
| error | Object | Error object. | ||
| affectedRows | Integer | Number of rows created by the query insert in the DB table. |
- select -
Requestobject
| Element name | Request level | Data type | Explanation |
|---|---|---|---|
| sQueryId | Required | String | In queries created in XML, the ID for the query to run when executing select. |
| objParam | Required | Object | Object contains values to be changed by the Mapper created in XML. |
| objReturn | Required | Object | Return objects are provided by the Framework (objects created in the Controller object). |
| bIgnoreFlag | Optional | Boolean | Ignore validation query (default value: true). True: Query does not affect the actual DB, error. False: Query does not affect the actual DB, success. |
- select -
Responseobject
| Element name | 2depth element name | 3depth element name | Data type | Explanation |
|---|---|---|---|---|
| objReturn | Object | |||
| success | Boolean | Indicates whether the select operation succeeded or not. | ||
| data | Array | Data received as the result of the select operation. | ||
| sysId | String | SYS_ID of data created as new when executing an insert. | ||
| requestID | String | Unique ID created for each lambda request. | ||
| error | Object | Error object. | ||
| affectedRows | Integer | Number of rows created by the query insert in the DB table. |
5.5. XML
In the query/DB Engine/xml files, write the queries to be executed when called from the DAO.
<?xml version="1.0" encoding="UTF-8"?>
<!DOCTYPE mapper PUBLIC "-//mybatis.org//DTD Mapper 3.0//EN" "http://mybatis.org/dtd/mybatis-3-mapper.dtd">
<mapper namespace="mysql">
 <insert id="insertData">
   INSERT INTO TEST_TABLE
     (
         ${systemField}
       , TEST_NAME
       , TEST_DESC
     )
   VALUES
     (
         ${systemValue}
       , #{sampleName}
       , #{sampleDesc}
     )
 </insert>
</mapper>
By using ${systemField} and ${systemValue}, we can automate the handling system fields provided by the CALS platform. Below is a list of system fields that can be processed automatically, along with examples categorized by query type.
| Field | Data type | Explanation | Available values |
|---|---|---|---|
| SYS_ID | VARCHAR(32) | (PK) Identifier value to distinguish selected Row data of the table. | Unique value within 32 characters |
| SYS_CREATE_BY | VARCHAR(32) | Identifier value of the person creating the data | Within 32 characters |
| SYS_MODIFY_BY | VARCHAR(32) | Identifier value of the person modifying the data | Within 32 characters |
| SYS_CREATE_DATE | DATETIME | Initially created date and time | Ex. 2020-11-02 13:13:13 |
| SYS_MODIFY_DATE | DATETIME | Latest modified date and time | Ex. 2020-11-02 13:13:13 |
| SYS_TYPE | VARCHAR(32) | Data type | 32 characters |
| SYS_FLAG | CHAR(1) | Use the data or not | 1 or 0 |
| TL_ACC_ID | VARCHAR(32) | Identifier of the account owning the data | Within 32 characters |
| TL_APL_ID | VARCHAR(32) | Identifier of the application owning the data | Within 32 characters |
Example for insert query.
<insert id="exampleInsert">
   INSERT INTO TEST_TABLE
     (
         ${systemField}
     )
   VALUES
     (
         ${systemValue}
     )
 </insert>
Example for update query
<update id="exampleUpdate">
   UPDATE TEST_TABLE
   SET ${systemValue}
   WHERE [Search condition] = ${Query conditions}
 </update>
Example for select query
<select id="exampleSelect">
   SELECT
           ${systemField}
   FROM    TEST_TABLE
   WHERE   1 = 1
   AND ${systemValue}
 </select>
Example for delete query
( systemField, systemValue를 can not be used. )
<delete id="exampleDelete">
    DELETE FROM TEST_TABLE
    WHERE SYS_ID = ${delete condition}
 </delete>
6. Debugging
6.1. Click mouse in the part displayed in addData part of dao.js or position cursor in the desired point, then click on F9 to show breakpoint to check when debugging

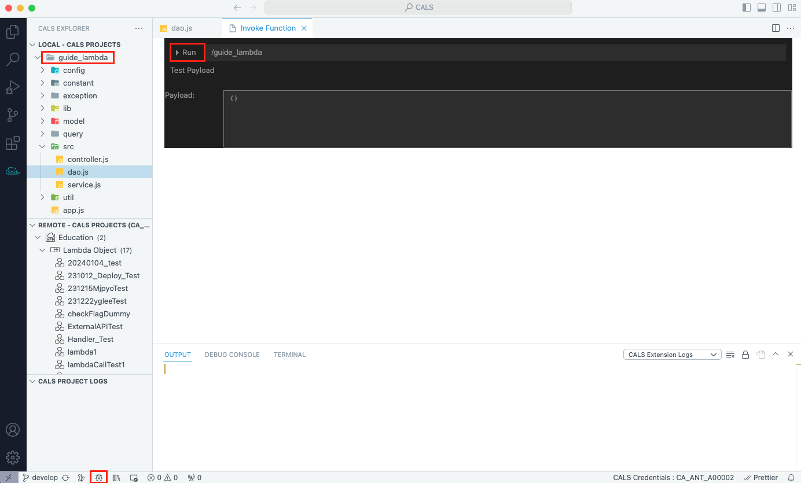
6.2. Press the shortcut "Ctrl + Shift + F5" or click the Debug icon in the lower left to display the Invoke Function window. Verify that the project name matches the one you created and click Run.
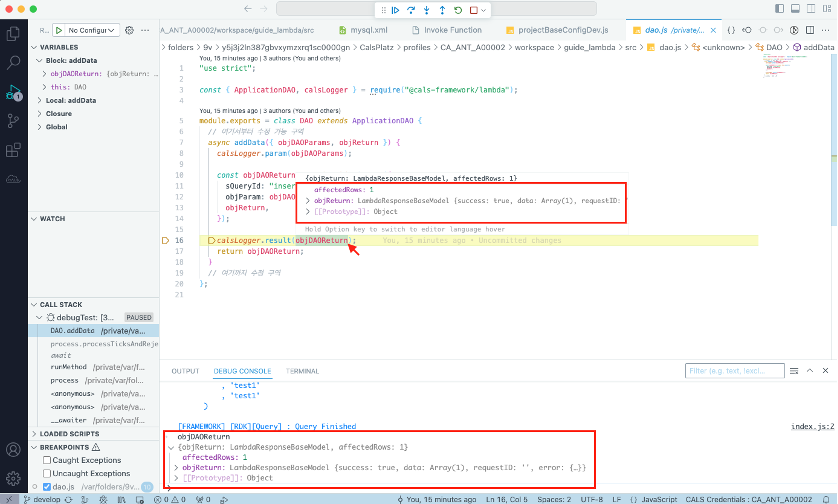
6.3. To move to the next line of code from the breakpoint, click the highlighted button at the top or press F10.
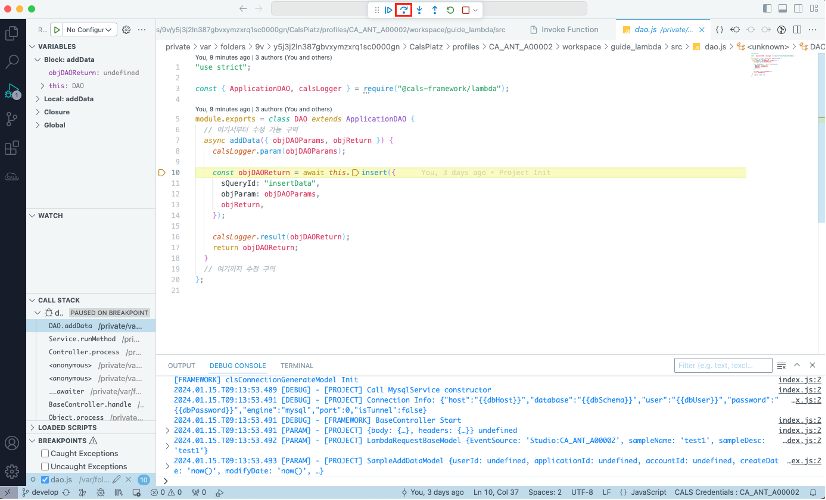
6.4. After confirming that the debugger has moved to the next line, position your mouse cursor over the object you want to inspect or enter the value you wish to check in the DEBUG CONSOLE window below.
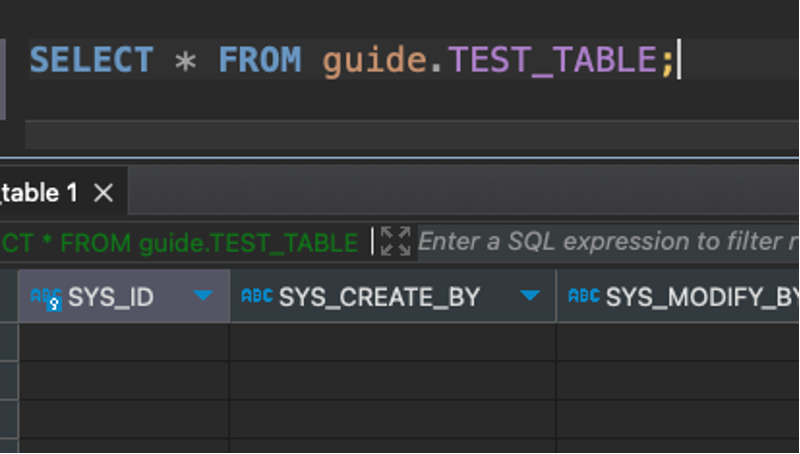
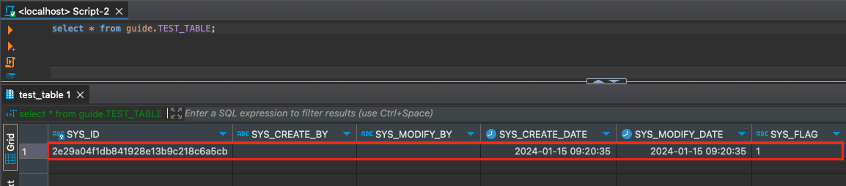
7. Check result
- Connect to the local
DB, to check if the code works properly, query the table to verify if the data has been registered properly.
8. Deploy
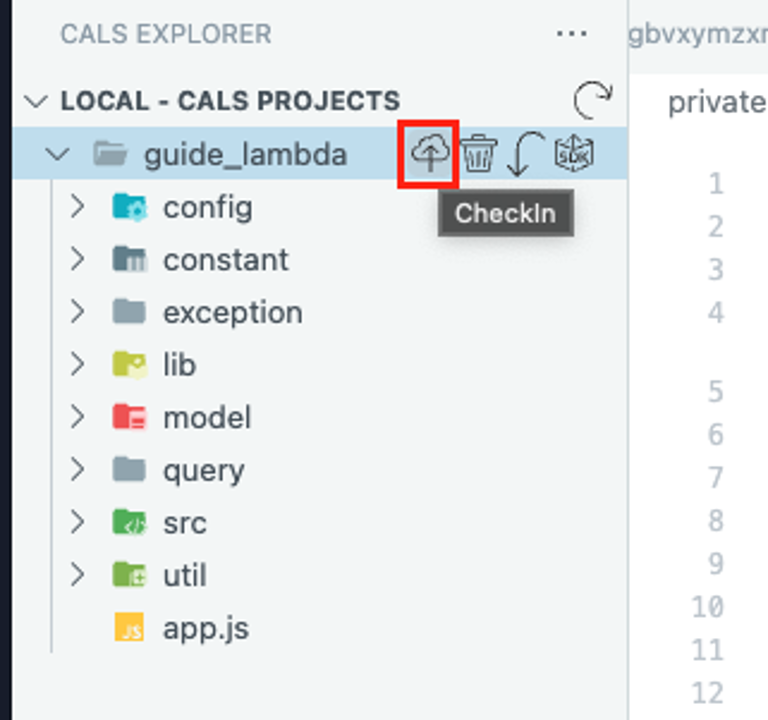
8.1. Click the Checkin button to reflect the Lambda project that has completed development and testing into the Application environment.
(For the Check-In process details, please refer to link.)
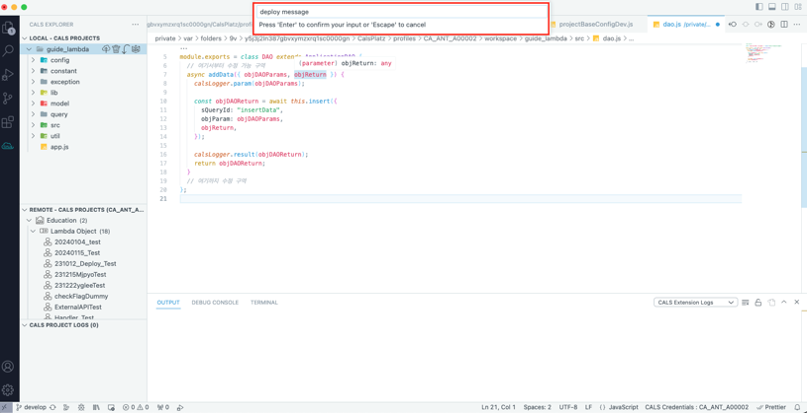
8.2. After clicking the Checkin button, enter the deployment message at the top of the popup, and then click Enter.
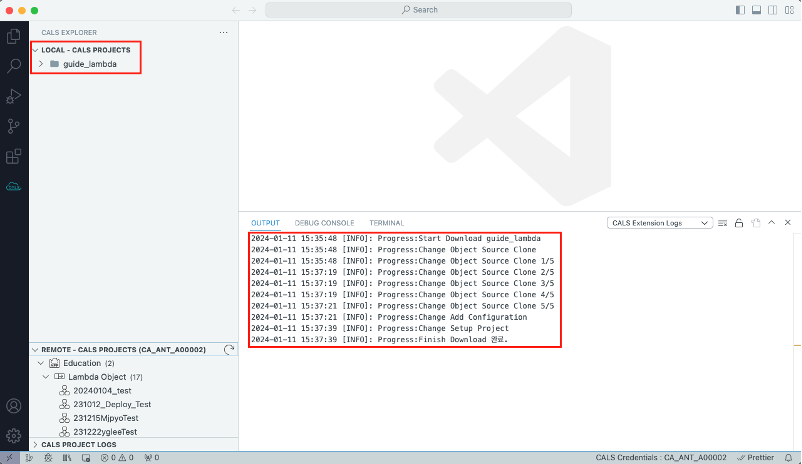
8.3. Check log noted “Progress:Finish Deploy complete” in Local log.
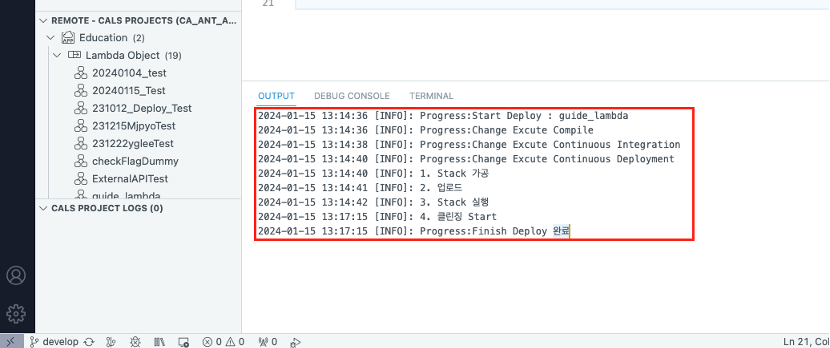
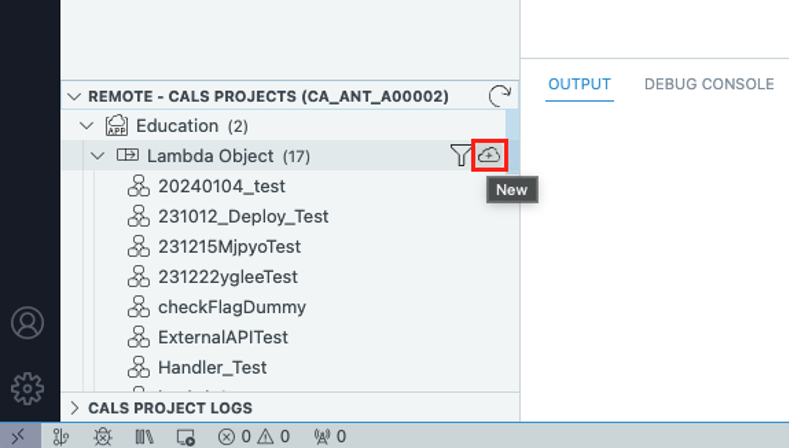
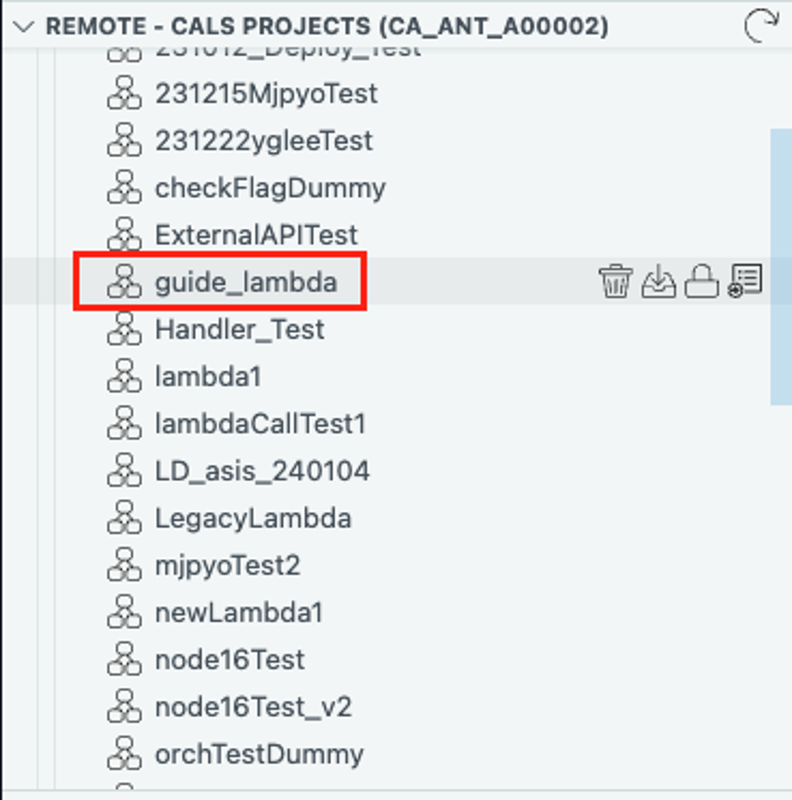
8.4. Verify that the deployed Lambda appears in the Remote Project area.
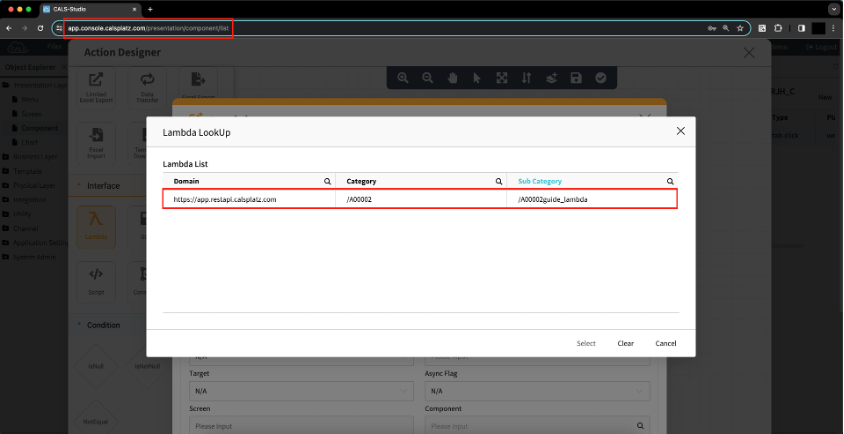
8.5. Access Studio and check under Action - Lambda Node to verify if the checked-in Lambda project has been created.